
Book Cover Creation Tip 2
◆ Tips for making a book cover kit 2
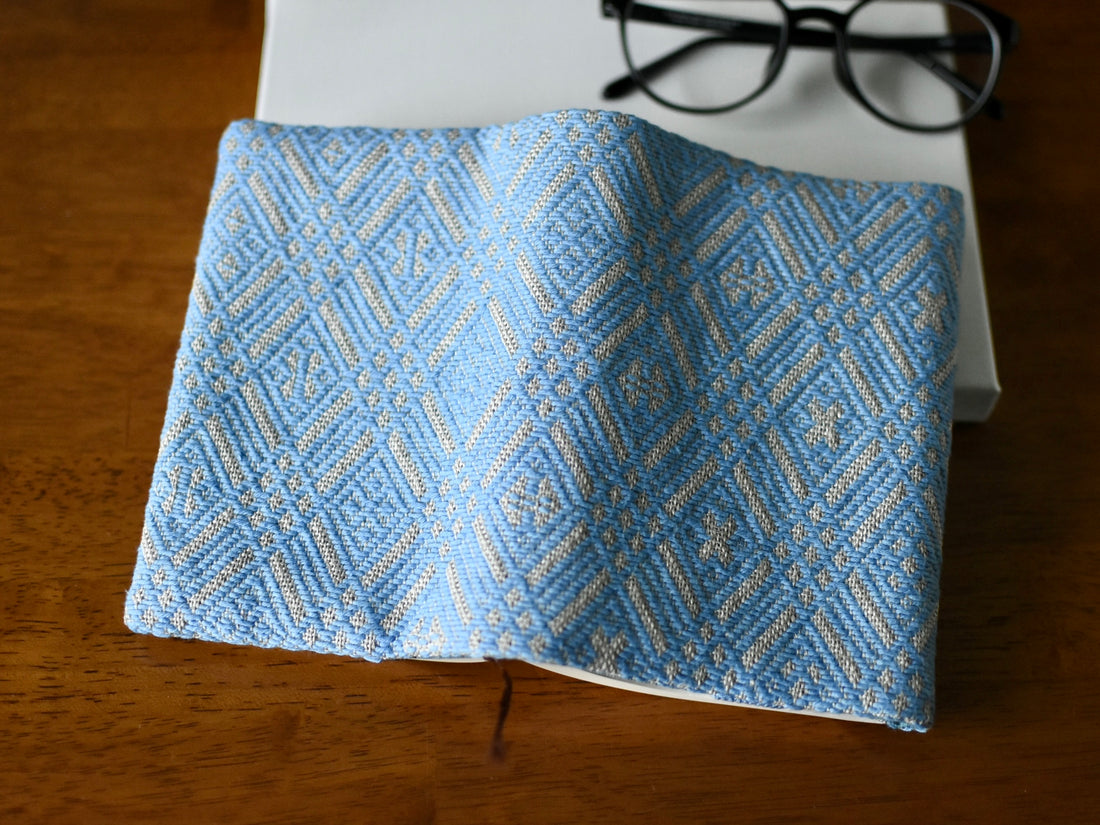
In my blog I wrote the other day, Tips for Making a Book Cover Kit , I mainly introduced the steps before sewing. I explained that the first few steps are the most difficult, as there is a possibility that those who are just starting out with Kogin embroidery may start embroidering right away but then get discouraged because it is too difficult. I also mentioned how to understand the pattern to make it easier to grasp the rhythm . Kogin embroidery patterns follow certain rules , and this particular pattern was completed by fitting various patterns into those rules. Therefore, I recommend imprinting the rhythm into your body.
◆ Thread slack in thread set
The amount of thread required for this book cover kit set is quite large, so we have included a generous amount. The instruction manual states the amount of thread required, but the amount of thread required varies greatly depending on whether you are stitching one row at a time, three rows at a time, or six rows at a time, so we have included a generous amount, assuming that the person who needs the most will have nearly 20m left over . Some people who stitch many rows at once may have more than 30m left over, but we have done so as described above because it is not as easy to deal with thread shortages as it is when you live in Japan. Please use the remaining thread to create your own work. We apologize for the inconvenience, but please be aware that we do not offer refunds.
Of course, we will respond promptly if there is a shortage of thread. I have left the same lot of thread used in the kit in Japan, and have coordinated with my family to have it delivered within a week.
Thanks to our customers who have been inconvenienced by thread shortages in the past, we have now learned how to overestimate the amount of thread we need. We have been able to continue selling kits thanks to the support of so many people. We would like to express our sincere gratitude.
◆How to use the colored frames in the design If you have a paperback size, you may be able to use the A3 design as is, but if you have a paperback size, the A3 design may be too small, so we have included a design divided into A4. The yellow dot shows the center of the design, so please cut or fold it and tape it together to use. We hope you will enlarge the A3 design at a convenience store or make it easier to use. The colored frames in the design are just a guide to the fact that if you stitch within the frame, you will get a Kogin stitch with a range that is almost the same as the instructions. As there will be individual differences depending on how you stitch, please use them as a guide only and measure the length yourself.
◆ Shrinkage of Kogin fabric after embroidery

The other day I finished embroidering a kogin for a paperback book cover. The degree of shrinkage varies from person to person, so it may not apply to everyone, but I will tell you the key points of how I sewed a kogin that could not be sewn according to the dimensions specified in the instructions. The sample is a paperback book, but the idea applies to all new books and hardbacks. First, I sewed a book cover from a piece of fabric that was 2cm in total width (1cm on each side) shorter than the dimensions specified in the instructions. Shrinkage is unavoidable, and I have personally confirmed that it is possible to complete it perfectly even if it is a little short in width, so please rest assured.
◯ Shrinkage of the fabric
If the length is not enough, you can add more, so don't worry about it. In my case, the width shrunk by 5-7mm after stitching, and 2-3mm after ironing. However, if you stretch the fabric while it is slightly damp with a steam iron, the distortion will be reduced, so I don't think it will only shrink when ironed. The instructions also state the range of Kogin stitching before ironing, but in reality, it's not a problem if the width is off by about 1cm from the instructions, so please enjoy your stitching! It's all in millimeters, so even though I've written so much, you don't need to worry too much about it.
・Inner purple line ▶ A line drawn perpendicular to the most shrunk point ( the center line marked in red ) (a mark is made 1 cm outward from this point)
・Outer purple line ▶ A line drawn perpendicular to the point of least shrinkage (not important, but it was helpful when drawing the inner purple line)
◯How to deal with shrinkage (distortion)
After steam ironing, gently stretch the center section, which has the most shrinkage, horizontally to reduce the difference with the top and bottom sections ( yellow lines ), which have the least shrinkage. Distortion is unavoidable, so don't worry about it. To process the edge on the side that is not the size adjustment side (the side with the twill tape), fold 1 cm from the inner purple line above to the back and sew the edge. (See the instructions for details)
◆Points to remember when sewingWhen gluing the adhesive interfacing, make sure that the top and bottom rows ( yellow lines ) are not slanted as much as possible, and align the fabric before attaching it. After attaching the adhesive interfacing, trust the fabric and mark it with a chalk pen or something similar according to the measurements . Even if it is distorted, it will be sealed on the back as you sew it, so don't worry about it. The key is to keep adding color with a pen that disappears over time, and visualize how to handle the fabric in front of you . If you look at your own Kogin fabric after you have finished stitching, you will see that the Kogin embroidery part is not that distorted.

◆ Draw lines where you will sewThis cover was sewn by hand. Thanks to everyone who bought the kit and told me that it was hand sewn, I was able to demonstrate hand sewing. As a result, there were no problems with hand sewing. Even though I am a beginner at hand sewing, I was able to complete the cover exactly as described in the instructions. However, drawing lines where you will sew allowed me to sew with confidence. I also draw lines when using a sewing machine, and although it can be nerve-wracking to sew a Kogin that you have worked hard on, try to reduce your anxiety as you go along!

◆ When the area where the kogin embroidery is done is not wide enough

(Just make sure you have enough length from the center to the left and right pockets.)
When sewing, the width of the yellow part will be secured. For example, if there is a total of 2 cm shortage, the width of the left and right pocket parts will be shortened by 1 cm. (This is how I sewed it this time.) If there is a total of 4 cm shortage, the axis of sewing will be changed, so we will deal with it separately. In that case, please let us know by the message function of minne.
The photo below shows a cover that was made with a total width of 2cm missing. I put a book that was about 1.5cm thick inside, but the part circled in yellow protrudes 1-1.5cm beyond the tape, and it still looks fine.

◆ If you are worried about fraying, leave a larger seam allowance. Once you apply the fusible interfacing, there will be almost no worry of fraying, so the instructions say to leave a 1cm seam allowance, but you can also leave a 1.5cm seam allowance when sewing and cut it to 1cm when you turn it over. You can also leave the 1.5cm seam allowance and finish it as is.
▶︎Goldfish Nebuta Kit Design and Instruction Data Sales
・Goldfish Nebuta with a gentle face▶️ minne sales page
・Goldfish Nebuta with a brave face▶️ minne sales page
▶️Materials Research Blog
▶️Shop (We plan to expand the digital design lineup in the future, except when we are temporarily back in Japan)
▶️Instagram (We share the simplicity and fun of Kogin embroidery through videos, etc.)
Satonobou